Showing posts with label xp. Show all posts

Monday, September 30, 2013

How to get The Simpsons Hit and Run working on Windows XP, Vista, 7, 8, 8.1 and 10 (32 / 64 bit)

Post Updated 21st Aug 2017 for Windows 8/8.1 and 10 users :)

OK, for the past few days I've been troubleshooting this issue and I found the perfect fix for both Windows XP Professional/Home Edition, Windows Vista, 7, 8, 8.1 and 10 (both 32 bit and 64 bit versions).

First Step: INSTALL THE GAME


Win XP: You can install to the default directory without any issues.

Win Vista / 7 / 8 / 8.1 / 10 (32 and 64): Install to a folder on your main OS drive such as C:\GAMES\SimpsonsHnRun

*** IMPORTANT *** Have no spaces in the folder to install to!

During installation you will be asked if you want to install DirectX 8.1 ... SELECT NO!

Step 2: Make sure you have DirectX 9 installed!


For XP you should automatically have DirectX 9.0c installed. If not get it here:

http://www.microsoft.com/en-gb/download/details.aspx?id=34429

For Windows Vista / 7 / 8 / 8.1 / 10 install DirectX 9 from here:

http://www.microsoft.com/en-gb/download/details.aspx?id=35


NOTE: Windows 10 users may need to enable DirectPlay in Legacy Components.

To enable Direct Play feature on Windows 10:

1) In your Start Menu, open Programs and Features (it's also in Control Panel)
2) In the left hand side menu, click on "Turn Windows features ON or OFF"
3) In the list that loads, make sure there is a tick in the box for "Legacy Components"
4) Click the plus symbol to expand the "Legacy Components"
5) Make sure the box is ticked for "Direct Play"
6) Click OK
-- If there are issues, temporarily disable your anti-virus program as this may stop the Legacy Components installing correctly.

Step 3: Set the executable properties


a) Right click on the desktop shortcut and select 'Properties'

-- If you don't have a desktop shortcut navigate to the main game folder and right click on the main game executable 'Simpsons.exe'

b) Click on the compatibility tab and set the following settings:

-- For Windows XP, set only "Windows 98/ Windows ME" and "Disable visual themes".
-- For Windows 7 and Vista users, please use the settings illustrated:


-- For Windows 8, 8.1 and 10 users, use the following settings:


Thanks to MrCorZa for the above screenshot.


Now try and run the game!

If it runs, great! You're done and you can now play the game.

If not then there is one other option you can do to gaurantee the game will work (I had to do this next step).

Step 4: Install a no-cd crack to get the game working


Don't worry if it doesn't work yet as you can do what I did and download a "no cd crack". This is not illegal in any way. A no cd crack is what it states. It is a main program executable file which has been edited so that the game CD is not required in order to play the game. It skips disk checking securities.

a) Go to http://gamecopyworld.com/

b) Click on the main site link "Main #1" if it is online, if not select another mirror site which is online

c) Read and click on the "Enter" button

d) Once the page loads, on the right hand side there is a heading "PC", click on "[T-Z]"

e) Scroll through the list for the game title "The Simpsons Hit & Run" and select the title link

f) Once the page has loaded click on "The Simpsons: Hit & Run [ENGLISH] No-CD/Fixed EXE #1"

g) Click on the File Archive [922KB] icon (a blue disk - far left of the header)

h) A Pop-up window will appear with an advert loaded ... in the top right select "Skip Ad" when it is shown after the countdown

i) Once loaded download the "flt-har.rar" file from any of the mirror links and save it to your downloads folder (or somewhere temporary like the desktop)

j) You will need 7-zip to be able to unzip the compressed rar file

k) Once uncompressed you will have a replacement "Simpsons.exe" ... Cut and paste this into the main game folder and replace (over-write) the file when asked

l) Double check that the properties are still set as mentioned in step 3 above

n) Play the game and it should now play without any issues

Friday, March 29, 2013

Windows XP Pro BSOD Event ID 7000 "Parallel Port Driver Service failed ..." [Solution]

Do you keep getting blue screen of death (BSOD) or sudden system power off with a restart? I had this recently when playing OMSI Bus Simulator but this can happen in other circumstances as well from the research I did on this. Either way this should help you fix this issue.

If you do check 'System' within your Event Viewer (Control Panel - Administrative Tools - Event Viewer). Look out for:

Event ID 7000, Source "Service control Manager", Description "The Parallel port driver service failed to start due to the following error: The service cannot be started, either because it is disabled or because it has no enabled devices associated with it.

Print Screen:

SOLUTION

Step 1) Boot into your motherboards BIOS and disable the parallel port (see your motherboards manual on how to do this).

If you don't know what make and model your motherboard is then use PC Wizard to find this out so you can download the manual from your motherboards manufactures web site (Google the manufacture if you don't know their web site address).

Step 2) Within Windows XP Professional open Device Manager (Start - Run, type in "devmgmt.msc" without the quotes and click ok).

Within Device Manager click on the 'View' menu and select 'Show hidden devices'. Scroll through device manager until you find 'Non-plug and Play Drivers - Parallel port driver', Right click and select 'Disable', click 'Yes' when presented with the stop functioning warning and restart when asked.


Wednesday, May 30, 2012

Transform Windows XP / Vista into Windows 7 =)

Have you ever wanted to have Windows 7 features for Windows XP / Vista?

windows 7 and windows xp logos together

Features such as: aero snap, aero peek, aero shake, Windows 7 boot screen, Windows 7 login screen, Windows 7 sounds, Windows 7 cursors, Windows 7 taskbar, Windows 7 wallpaper, Windows 7 sidebar, Windows 7 progress dialogue box, Windows 7 shutdown / log off / restart dialogue box, Windows 7 about windows box, Windows 7 system properties dialogue box, Windows 7 volume control window PLUS loads more mods!

Well here is a post which can help you do just that !

You can pick what features you have. I personally only use a few.

To learn how, follow this XP tutorial / Vista tutorial by VG. I take no personal credit for this tutorial and did not see the need to do my own as the latter is just that good =)


IMPORTANT NOTES:

You can install Tuneup Utilities to easily apply the login and boot screens; then once applied you can uninstall Tuneup Utilities and the screens will stay ... however best test that they work / you want to keep them before uninstalling Tuneup Utilities ;)


ISSUES / FIXES:

1) QT Addressbar does not work well with the Windows 7 themes due to activation of the x-mouse features ... read below to understand and even fix this issue.

There is a bug in which the QT Addressbar does not work correctly when installed along side the Theme(s) ... i.e. When you select the first option and then scroll over the drop down menu for the directories, the mouse pointer 'focuses' the window and brings it to the front (i.e. activating it).

TO FIX this install Microsoft PowerTool Tweak UI and under the mouse settings; X-Mouse ... untick 'Activate follows mouse (X-Mouse). Click 'Apply' and the setting should be instant; if not simply restart =)

This then allows you to have the proper functionality of the QT Addressbar.

You can always use the ALT + TAB feature to change focus to a window of choice =)


Wednesday, March 23, 2011

SOLUTION: Systray \ System Tray icons missing on taskbar in Windows XP?

Have you ever found that one of your system tray icons is missing when you boot up Windows XP?

The system tray (in short systray, also called taskbar notification area) is the icon strip located to the far right end of the task bar, next to the clock. Some Windows XP installations have a defect, in that some systray icons disappear or, rather, do not appear, when the system is booted when a user logs on. The problem is even more common on systems with autologon. The most frequently affected icons seem to be the speaker icon (sound volume) and the power / energy icon if on a laptop (notepad).

I had my sound icon missing for a while on my desktop but recently I found a very easy way to correct the problem. Very annoying as when ever I wanted to increase or decrease the volume I would have to go into Control Panel; Sounds and Audio Devices.

To fix this, simply download and run (on the affected computer) the installer below (after unzipping it using 7zip or what ever you use to unzip zip files):

http://nars.aloj.net/download/shell32patch.zip

Monday, June 14, 2010

Windows XP Error Deleting / Moving File or Folder: Access is Denied = SOLUTION !

All images in this post can be enlarged by clicking on them!

Have you ever had windows provide an error to you saying you cannot move or delete a file or entire folder because you do not have access to it?
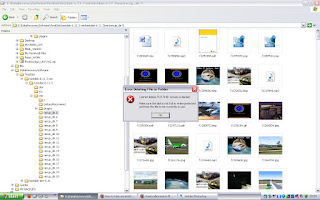
Well I spent a good few minutes troubleshooting this the other night. After about an hour I finally worked out why my Windows XP Professional was not allowing me to delete 5GB of data files off my external hard disk drive. This is the error message in question:
"Error Deleting File or Folder

Cannot delete f0045528: Access is denied.

Make sure the disk is not full or write-protected and that the file is not currently in use."


To solve this issue so you can delete the folder you do have to do two actions:

1) Disable simple file sharing if it is enabled - Depends on your OS - (Windows XP Pro)

2) Take ownership of the folder (or files within the folder) in order to be able to have permissions to delete them or move them.
Step 1 (Windows XP Home users)


Windows XP Home users will need to start windows in safe mode (press your F8 key continuously at start up until you are provided with a black screen and a load of white text options. Select 'Start Windows in Safe Mode'. Then navigate to the folder / files you wish to delete or move.

Step 1 (Windows XP Pro users)

Visit the following link on how to do this:

http://support.microsoft.com/kb/307874/
Then navigate to the folder / files you wish to delete or move.

Step 2 Take Ownership and set permissions
In my example I had a folder which I wanted to delete. Yet it was the actual files inside the folder which needed the permissions and ownership changing.

Instead of spending ages changing the ownership and permissions for one single file at a time I selected all files in the folder I wanted to delete (using Crtl + A); then gave each file within the folder the same ownership and permissions enabling me to delete the entire folder.

First though before you continue to delete (or move) your files / an entire folder. Make sure you are logged in as an administrator otherwise you won't be able to change the files ownership or permissions.

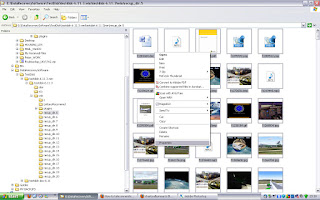
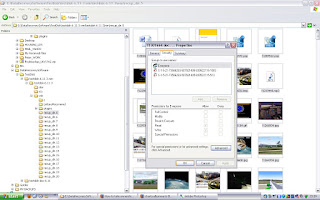
1) After selecting all the files in this example, you need to right click and select properties as shown:


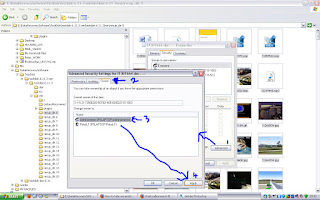
2) On the 'Security' Tab of the properties window; click on 'Advanced' (1)

3) On the 'Advanced Security Settings' window, select the 'Owner' tab (2). Notice in my example that the owner is completely different to the currently logged on user (PeterLT). So in order to set permissions (you may have noticed they were greyed out on the main security tab); we need to confirm who owns the files.

4) In my example I select 'Administrators' (3) and then click 'Apply' (4) in order to make the files owned by all administrators; so all admin accounts will be classed as the owner of the files.

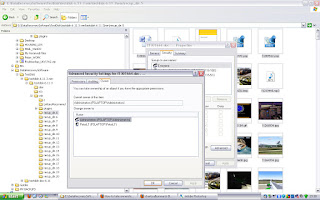
5) Now click on 'OK' and you'll find that the permissions are still greyed out, even though we have changed the owner of the files:

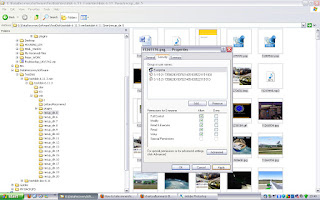
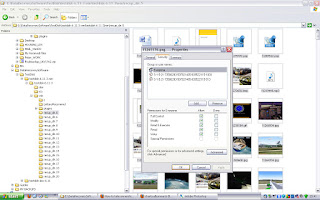
6) So click on 'OK' on the properties window to close it and save the ownership changes. Then select all files again and right click, selecting properties (short cut way is to simply press 'r' when the right click menu appears on screen). Now we can change the permissions:

7) On the 'Security' tab, select 'Everyone' so that it is highlighted grey. Then in the permissions window below tick the checkbox 'Allow' to the right of 'Full Control' - all boxes below will become ticked also. Then click on 'Apply' to confirm the change in permissions:

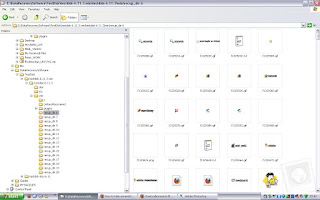
8) Now you can delete (in this case) the entire folder as all files have been successfully changed to allow such an action on the account you are logged in with:

That's it. All you need to do. Same goes for moving files as well. It is more than likely either (a) a file / folder permission problem or (b) an ownership problem.

Hope you found this helpful. Resources used as help for myself:

http://support.microsoft.com/kb/308421

Tuesday, March 02, 2010

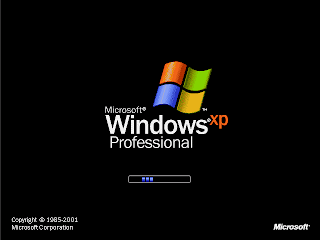
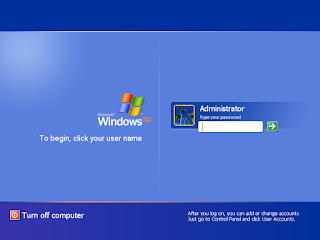
Did you know you can change the Windows Boot Screen (and/or) Logon screen(s)?

How can I change my Windows Boot / Logon Screen?

Q) What is the windows boot screen?

This is what the Windows Boot Screen is (Windows XP Pro shown):


Q) What is the Logon screen (again Windows XP shown):


OK, so now you know what we're on about being able to change; if you weren't before that is.

Q) How do we customise these screens then?

Easy to do. Firstly you need to go and install the software which you need to do this with.


1) Download and Install the software needed to customise the screen(s)

Install the BootSkin for Windows XP (last release is 1.5a) or Vista (Windows 7 isn't supported yet) by visiting the following link:

http://www.stardock.com/products/bootskin/downloads.asp

For customising your Windows Logon screen you will need to download and install LogonStudio (which does support Windows 7 as well as Vista and XP):

http://www.stardock.com/products/logonstudio/

NOTE: You don't need both if you only want to change one screen; so download and install the ones you will use.
2) Find a skin to use instead of the default (note you can always revert back so don't worry)

To get skins (which are images you use to change the default screen); visit the 'Get [Windows Version] Skins' links at the top of the links within the previous paragraph.

Or go direct to the web site http://www.wincustomize.com/ and use the menu (currently on the right hand side of typing this post, scroll down a bit). You can then use the search feature.

Why not make your own logon or boot skin? See question at the end of this post on how to do this!

Note: It's best to use the links from the StarDock web site to make sure you are getting the correct skins.

3) Download the Skin and apply it using the StarDock software

a) Once you have found the skin you would like to apply as your boot / logon screen; simply click the download button on the
wincustomize web site skin page and save the file somewhere temporary like "My Documents".

b) Open the BootSkin or LogonStudio application and use it to apply your chosen skin. You can simply click on the file as well which should open with the correct application.

BootSkin Note: You may need to import the skin in order to select it in the list if clicking on the file does not open the application. To do this click on 'File > Import from file', navigate to where you downloaded the skin to and click on open once you have the skin file selected.

LogonStudio Note: You need to unzip .zip files before you can open the skin in LogonStudio. Use 7-Zip (OpenSource) or other (winzip or winrar etc).

Need help?

Visit the following forum links for support: BootSkin Forum / LogonStudio Forum


Q) Can I create my own logon or Boot screen skin?

YES!

Visit the appropriate link below to create your own. If you think it is good, then upload it and share it on the wincustomize web site for others to enjoy too!

NOTE: You do not need to use Photoshop. If you like you can use Paint Shop Pro, or an OpenSource application such as http://www.gimp.org).

Boot Skin Tutorial

LogonStudio: Use the 'New' button to create your own ... see below for help ...

Comes with it's own Help which is installed with the application on your local hard drive (or where ever you install it to). However, you might find this post useful.

Monday, November 23, 2009

The easy way to avoid Windows OS Update after a complete re-install :)

Warning: ALWAYS KEEP YOUR OS UP-TO-DATE !

In a situation whereby you need to reinstall your OS, but afterwards you don't want to bother waiting ages for the Windows Update to download and install all those updates?

Well here is a post which will aid you for the next time, of which will save you considerable time!

When I reinstall my OS (currently XP), before I do so, I make sure I have all the major Service Packs downloaded, the most Recent Internet Explorer (even though I use FireFox), the most recent MS Office Service Pack and of course the latest Windows Media Player etc.

Once finished reinstalling I get the media (I tend to keep them on DVD or Internal / External Hard Disk Drive), install the service packs and drivers etc which saves hours of downloading them from the web! Then once connected to the web I allow the OS to download the smaller updates which takes not so long on a Broadband connection. Only after Windows is completely up-to-date do I install any other software or applications, games etc.

So, where do you get these "Stand alone" service packs and other installations?

Simple, the Microsoft web site of course :D

They tend to name the Windows Service Packs '[Windows OS Version] Service Pack # Five Language Standalone' or '[Windows OS Version] Service Pack # Network Installation Package for IT Professionals and Developers'; or similar.

Listed below are a few direct links to save you time searching their Download Centre section. All links on my blog posts always open in a new window or tab depending on your browsers setup.

However in time you may want to use this page: http://support.microsoft.com/sp. When using that link though, once you have selected the product make sure to look for the heading 'Download ...' so you can download the latest Service Pack rather than having to do it via Windows Update.

If you need to search for some other product or application update to download the installer, use the Download Center Home Page Search Feature.

Windows XP Service Packs (32 bit and 64 bit)

SP2 (Includes SP1) / SP3 (These are for 32 bit ONLY)


SP2 (Includes SP1) /  SP3 NOT AVAILABLE FOR XP 64 bit (These are for 64 bit ONLY)


Windows Vista Service Packs (32 bit and 64 bit)

SP1 / SP2 (These are for 32 bit ONLY)

SP1 / SP2 (These are for 64 bit ONLY)


Windows 7 and Windows Server 2008 R2 SP1

Service Pack 1 (both 32 bit and 64 bit ---> x86 is 32 bit and x64 is 64 bit)
 

Stand Alone Installations (All Window Versions)

Windows Media Player (latest version) / Internet Explorer (latest version)


MS Office Service Pack

MS Office 2003 SP3 (includes SP1 and SP2 also) / MS Office 2007 SP1 Suite

MS Office 2010 SP1 (32 bit) / (64 bit