Showing posts with label download. Show all posts

Sunday, November 12, 2017

Download Newcastle Pro v4 for OMSI and OMSI 2

1) Download the Newcastle Pro v4 RHD map from here.


2) If you have OMSI 2, you will need to download the patch from here:


3) Both OMSI  and OMSI 2 users may need to download additional repaints from here:

http://aussiex.org/forum/index.php?/files/category/62-omsi-repaints/&sortby=file_submitted&sortby=file_updated&sortdirection=desc

For support, use the following forum thread for aid. I recommend you state if you are installing for OMSI or for OMSI 2.

UPDATE:

Newcastle Pro LHD for OMSI 2: Download the file "NewcastleLPomsi2.7z" from the link in step 1 above. You will need 7zip to extract it. Read the readme file. There maybe some scenery objects and splines missing. Use google to find these. If the map doesn't work let me know.
Wednesday, November 19, 2014

Realtek ALC 1200 up to date driver (Any ALC HD Audio card)

Those of you looking for an up to date driver for your Realtek HD Audio card have come to the right place!

For some reason Realtek don't seem to list all the HD ALC Audio cards supported by their HD Driver that is released. For example I have the Asus P6T motherboard which has the Realtek ALC1200. Upon reading the latest HD Driver Readme file this is not listed as a supported driver; when in actual fact any Realtek ALC HD Audio cards are supported by their HD Driver!

So; if you have a ALC1200 (or other HD Audio card) then visit the link below for the latest Realtek HD Audio Driver:

http://www.realtek.com.tw/downloads/downloadsView.aspx?Langid=1&PNid=14&PFid=24&Level=4&Conn=3&DownTypeID=3&GetDown=false

Thursday, May 29, 2014

Start Menu for Windows 8 and 8.1 (for those who miss the windows start menu)

For those who miss the old classic windows start menu here is a solution worth a download.


I recently was round at a friends house and saw that they had a start menu for windows 8!

If you hate the new Windows 8 start menu and miss the old classic start menu then here is a solution which is certainly worth downloading and installing!

http://www.classicshell.net/

Visit the link above to learn more.

A couple of alternates are ...

Start Menu 8 by IOBIT (the same people who developed the excellent smart defrag).

Pokki.

Monday, March 04, 2013

Cannot download Flight Plan in vroute? [Solution]

Hi all,

Not sure if any of you out there are flight sim enthusiasts; probably some of you are!

If like me you've recently had problems whereby you've chosen a flight; selected export, chosen your flight time and aircraft, date etc ... then clicked on the button which creates the FP ... only to have internet explorer open and suddenly close ... there is another way to download the flight plan :)

Simply right click on the link within vroute and select 'Save target as ...'; then save the flight plan to your flight plan folder and away you go as normal.

hope this helps someone because it irritated me for hours today.

Saturday, March 19, 2011

SOLUTION: Trouble finding firmware or drivers for hardware that is not listed within manufacturers archives?

I just spent 30 minutes trying to find an updated firmware for my relatively 'newish' Sony DVD-ROM (SONY DVD-ROM DDU1615S drive) and Sony DVD-RW DL (SONY DVD RW DRU-190S) drives.

For those who found this in a Google search and just need to download the firmware for either drives named above, below this paragraph are direct links just for you as I am too kind :)

SONY DVD-ROM DDU1615S | SONY DVD RW DRU-190S


Now of course the first place that I checked was the main manufacturers web site for Sony Optical Drives. Managed to find one drives firmware on there easily (the DVD-RW DL drive); but could not find the DVD-ROM drive within the archives. So as you do I did a Google search. Took me a while but there was a web site which really was the only place to find it:

Step 1) Go to the following web site and search for the hardware firmware (or driver)

Note: You may want to simply use the category link as that is useful as well, but personally I found it easier to simply search my hardware name 'SONY DVD-ROM DDU1615S' - selecting download and clicking on GO to find it listed in the results.

http://www.opendrivers.com/ (use the site search to the right hand side menu rather than the Google search at the top).

Step 2) From the results select your hardware which takes you to where you can download the driver (or firmware).

e.g. In my case download SONY DVD-ROM DDU1615S firmware result page :)

Step 3) Scroll down the page to find a heading ">> Driver Download >> "

Within this area you need to type in a validation code and click on the 'Download This Driver for Your Device from Open Drivers' button in order to get the download link (or several download links).

Step 4) Once this page has loaded you need to look carefully for the right download link as it can be confusing as to which link actually works (as in you do download the firmware or driver you need).

What I did was try the first link under "Official Driver Download" (which was a link back to the main manufacturers web site), but this was an outdated link and I had some other web site try and make me buy an application to scan my system and update drivers etc for me ... I don't want that!

So I went back to the page again and scanned around and found below the sponsored links a section called "Backup Download Server". Clicking the link here downloaded the right firmware for me. so I was happy.

Use the link under the "Backup Download Server " to download your firmware or driver if you find that the official links do not work.

Tuesday, March 02, 2010

Did you know you can change the Windows Boot Screen (and/or) Logon screen(s)?

How can I change my Windows Boot / Logon Screen?

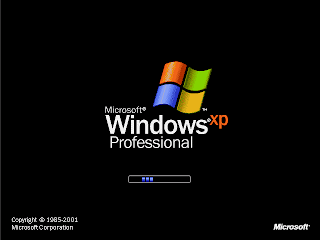
Q) What is the windows boot screen?

This is what the Windows Boot Screen is (Windows XP Pro shown):


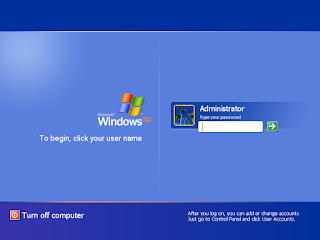
Q) What is the Logon screen (again Windows XP shown):


OK, so now you know what we're on about being able to change; if you weren't before that is.

Q) How do we customise these screens then?

Easy to do. Firstly you need to go and install the software which you need to do this with.


1) Download and Install the software needed to customise the screen(s)

Install the BootSkin for Windows XP (last release is 1.5a) or Vista (Windows 7 isn't supported yet) by visiting the following link:

http://www.stardock.com/products/bootskin/downloads.asp

For customising your Windows Logon screen you will need to download and install LogonStudio (which does support Windows 7 as well as Vista and XP):

http://www.stardock.com/products/logonstudio/

NOTE: You don't need both if you only want to change one screen; so download and install the ones you will use.
2) Find a skin to use instead of the default (note you can always revert back so don't worry)

To get skins (which are images you use to change the default screen); visit the 'Get [Windows Version] Skins' links at the top of the links within the previous paragraph.

Or go direct to the web site http://www.wincustomize.com/ and use the menu (currently on the right hand side of typing this post, scroll down a bit). You can then use the search feature.

Why not make your own logon or boot skin? See question at the end of this post on how to do this!

Note: It's best to use the links from the StarDock web site to make sure you are getting the correct skins.

3) Download the Skin and apply it using the StarDock software

a) Once you have found the skin you would like to apply as your boot / logon screen; simply click the download button on the
wincustomize web site skin page and save the file somewhere temporary like "My Documents".

b) Open the BootSkin or LogonStudio application and use it to apply your chosen skin. You can simply click on the file as well which should open with the correct application.

BootSkin Note: You may need to import the skin in order to select it in the list if clicking on the file does not open the application. To do this click on 'File > Import from file', navigate to where you downloaded the skin to and click on open once you have the skin file selected.

LogonStudio Note: You need to unzip .zip files before you can open the skin in LogonStudio. Use 7-Zip (OpenSource) or other (winzip or winrar etc).

Need help?

Visit the following forum links for support: BootSkin Forum / LogonStudio Forum


Q) Can I create my own logon or Boot screen skin?

YES!

Visit the appropriate link below to create your own. If you think it is good, then upload it and share it on the wincustomize web site for others to enjoy too!

NOTE: You do not need to use Photoshop. If you like you can use Paint Shop Pro, or an OpenSource application such as http://www.gimp.org).

Boot Skin Tutorial

LogonStudio: Use the 'New' button to create your own ... see below for help ...

Comes with it's own Help which is installed with the application on your local hard drive (or where ever you install it to). However, you might find this post useful.

Monday, November 23, 2009

The easy way to avoid Windows OS Update after a complete re-install :)

Warning: ALWAYS KEEP YOUR OS UP-TO-DATE !

In a situation whereby you need to reinstall your OS, but afterwards you don't want to bother waiting ages for the Windows Update to download and install all those updates?

Well here is a post which will aid you for the next time, of which will save you considerable time!

When I reinstall my OS (currently XP), before I do so, I make sure I have all the major Service Packs downloaded, the most Recent Internet Explorer (even though I use FireFox), the most recent MS Office Service Pack and of course the latest Windows Media Player etc.

Once finished reinstalling I get the media (I tend to keep them on DVD or Internal / External Hard Disk Drive), install the service packs and drivers etc which saves hours of downloading them from the web! Then once connected to the web I allow the OS to download the smaller updates which takes not so long on a Broadband connection. Only after Windows is completely up-to-date do I install any other software or applications, games etc.

So, where do you get these "Stand alone" service packs and other installations?

Simple, the Microsoft web site of course :D

They tend to name the Windows Service Packs '[Windows OS Version] Service Pack # Five Language Standalone' or '[Windows OS Version] Service Pack # Network Installation Package for IT Professionals and Developers'; or similar.

Listed below are a few direct links to save you time searching their Download Centre section. All links on my blog posts always open in a new window or tab depending on your browsers setup.

However in time you may want to use this page: http://support.microsoft.com/sp. When using that link though, once you have selected the product make sure to look for the heading 'Download ...' so you can download the latest Service Pack rather than having to do it via Windows Update.

If you need to search for some other product or application update to download the installer, use the Download Center Home Page Search Feature.

Windows XP Service Packs (32 bit and 64 bit)

SP2 (Includes SP1) / SP3 (These are for 32 bit ONLY)


SP2 (Includes SP1) /  SP3 NOT AVAILABLE FOR XP 64 bit (These are for 64 bit ONLY)


Windows Vista Service Packs (32 bit and 64 bit)

SP1 / SP2 (These are for 32 bit ONLY)

SP1 / SP2 (These are for 64 bit ONLY)


Windows 7 and Windows Server 2008 R2 SP1

Service Pack 1 (both 32 bit and 64 bit ---> x86 is 32 bit and x64 is 64 bit)
 

Stand Alone Installations (All Window Versions)

Windows Media Player (latest version) / Internet Explorer (latest version)


MS Office Service Pack

MS Office 2003 SP3 (includes SP1 and SP2 also) / MS Office 2007 SP1 Suite

MS Office 2010 SP1 (32 bit) / (64 bit