This one is one that I find useful. If you know some lyrics to a song but you don't actually know the song title or the artist, yet you wish to find out, then this is a good way to find out:
1) Go to a search engine (I tend to use Google)
2) Type in a line of lyrics (e.g. "strange what desire will make foolish people do")
3) Add the '+' symbol followed by the word 'lyrics'
so your search criteria now looks like ...
strange what desire will make foolish people do + lyrics
4) Click on search or press enter to get the results
Google Results from example above = Chris Isaak - Wicked Game
5) You should be able to go through the results and look at the lyrics to identify which song the lyrics are from; including the artist (note: some artists do covers so it may not be the exact version your looking for in which case I suggest using Shazam i.e. on my phone I call the number 2580 if I hear a song playing on TV or the Radio which I don't know and let it text me the artist and song title)
Hope this helps anyone who struggles :)
Thursday, July 22, 2010
Monday, June 14, 2010
Windows XP Error Deleting / Moving File or Folder: Access is Denied = SOLUTION !
All images in this post can be enlarged by clicking on them!
Have you ever had windows provide an error to you saying you cannot move or delete a file or entire folder because you do not have access to it? Well I spent a good few minutes troubleshooting this the other night. After about an hour I finally worked out why my Windows XP Professional was not allowing me to delete 5GB of data files off my external hard disk drive. This is the error message in question:

"Error Deleting File or Folder
Cannot delete f0045528: Access is denied.
Make sure the disk is not full or write-protected and that the file is not currently in use."
To solve this issue so you can delete the folder you do have to do two actions:
1) Disable simple file sharing if it is enabled - Depends on your OS - (Windows XP Pro)
2) Take ownership of the folder (or files within the folder) in order to be able to have permissions to delete them or move them.
Step 1 (Windows XP Home users)
Windows XP Home users will need to start windows in safe mode (press your F8 key continuously at start up until you are provided with a black screen and a load of white text options. Select 'Start Windows in Safe Mode'. Then navigate to the folder / files you wish to delete or move.
Step 1 (Windows XP Pro users)
Visit the following link on how to do this:
http://support.microsoft.com/kb/307874/
Then navigate to the folder / files you wish to delete or move.
Step 2 Take Ownership and set permissions
In my example I had a folder which I wanted to delete. Yet it was the actual files inside the folder which needed the permissions and ownership changing.
Instead of spending ages changing the ownership and permissions for one single file at a time I selected all files in the folder I wanted to delete (using Crtl + A); then gave each file within the folder the same ownership and permissions enabling me to delete the entire folder.
First though before you continue to delete (or move) your files / an entire folder. Make sure you are logged in as an administrator otherwise you won't be able to change the files ownership or permissions.
1) After selecting all the files in this example, you need to right click and select properties as shown:

2) On the 'Security' Tab of the properties window; click on 'Advanced' (1)
 3) On the 'Advanced Security Settings' window, select the 'Owner' tab (2). Notice in my example that the owner is completely different to the currently logged on user (PeterLT). So in order to set permissions (you may have noticed they were greyed out on the main security tab); we need to confirm who owns the files.
4) In my example I select 'Administrators' (3) and then click 'Apply' (4) in order to make the files owned by all administrators; so all admin accounts will be classed as the owner of the files.
 5) Now click on 'OK' and you'll find that the permissions are still greyed out, even though we have changed the owner of the files:
 6) So click on 'OK' on the properties window to close it and save the ownership changes. Then select all files again and right click, selecting properties (short cut way is to simply press 'r' when the right click menu appears on screen). Now we can change the permissions:
 7) On the 'Security' tab, select 'Everyone' so that it is highlighted grey. Then in the permissions window below tick the checkbox 'Allow' to the right of 'Full Control' - all boxes below will become ticked also. Then click on 'Apply' to confirm the change in permissions:
 8) Now you can delete (in this case) the entire folder as all files have been successfully changed to allow such an action on the account you are logged in with:
 That's it. All you need to do. Same goes for moving files as well. It is more than likely either (a) a file / folder permission problem or (b) an ownership problem.
Hope you found this helpful. Resources used as help for myself:
http://support.microsoft.com/kb/308421
Tuesday, March 02, 2010
Did you know you can change the Windows Boot Screen (and/or) Logon screen(s)?
How can I change my Windows Boot / Logon Screen?
Q) What is the windows boot screen?
This is what the Windows Boot Screen is (Windows XP Pro shown):
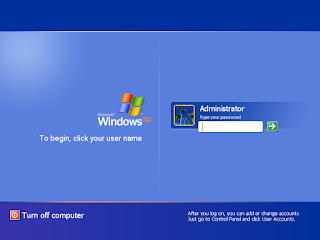
Q) What is the Logon screen (again Windows XP shown):
OK, so now you know what we're on about being able to change; if you weren't before that is.
Q) How do we customise these screens then?
Easy to do. Firstly you need to go and install the software which you need to do this with.
1) Download and Install the software needed to customise the screen(s)
Install the BootSkin for Windows XP (last release is 1.5a) or Vista (Windows 7 isn't supported yet) by visiting the following link:
http://www.stardock.com/products/bootskin/downloads.asp
For customising your Windows Logon screen you will need to download and install LogonStudio (which does support Windows 7 as well as Vista and XP):
http://www.stardock.com/products/logonstudio/
NOTE: You don't need both if you only want to change one screen; so download and install the ones you will use.
2) Find a skin to use instead of the default (note you can always revert back so don't worry)
To get skins (which are images you use to change the default screen); visit the 'Get [Windows Version] Skins' links at the top of the links within the previous paragraph.
Or go direct to the web site http://www.wincustomize.com/ and use the menu (currently on the right hand side of typing this post, scroll down a bit). You can then use the search feature.
Why not make your own logon or boot skin? See question at the end of this post on how to do this!
Note: It's best to use the links from the StarDock web site to make sure you are getting the correct skins.
3) Download the Skin and apply it using the StarDock software
a) Once you have found the skin you would like to apply as your boot / logon screen; simply click the download button on the wincustomize web site skin page and save the file somewhere temporary like "My Documents".
b) Open the BootSkin or LogonStudio application and use it to apply your chosen skin. You can simply click on the file as well which should open with the correct application.
BootSkin Note: You may need to import the skin in order to select it in the list if clicking on the file does not open the application. To do this click on 'File > Import from file', navigate to where you downloaded the skin to and click on open once you have the skin file selected.
LogonStudio Note: You need to unzip .zip files before you can open the skin in LogonStudio. Use 7-Zip (OpenSource) or other (winzip or winrar etc).
Need help?
Visit the following forum links for support: BootSkin Forum / LogonStudio Forum
Q) Can I create my own logon or Boot screen skin?
YES!
Visit the appropriate link below to create your own. If you think it is good, then upload it and share it on the wincustomize web site for others to enjoy too!
NOTE: You do not need to use Photoshop. If you like you can use Paint Shop Pro, or an OpenSource application such as http://www.gimp.org).
Boot Skin Tutorial
LogonStudio: Use the 'New' button to create your own ... see below for help ...
Comes with it's own Help which is installed with the application on your local hard drive (or where ever you install it to). However, you might find this post useful.

Q) What is the Logon screen (again Windows XP shown):

OK, so now you know what we're on about being able to change; if you weren't before that is.
Q) How do we customise these screens then?
Easy to do. Firstly you need to go and install the software which you need to do this with.
1) Download and Install the software needed to customise the screen(s)
Install the BootSkin for Windows XP (last release is 1.5a) or Vista (Windows 7 isn't supported yet) by visiting the following link:
http://www.stardock.com/products/bootskin/downloads.asp
For customising your Windows Logon screen you will need to download and install LogonStudio (which does support Windows 7 as well as Vista and XP):
http://www.stardock.com/products/logonstudio/
NOTE: You don't need both if you only want to change one screen; so download and install the ones you will use.
2) Find a skin to use instead of the default (note you can always revert back so don't worry)
To get skins (which are images you use to change the default screen); visit the 'Get [Windows Version] Skins' links at the top of the links within the previous paragraph.
Or go direct to the web site http://www.wincustomize.com/ and use the menu (currently on the right hand side of typing this post, scroll down a bit). You can then use the search feature.
Why not make your own logon or boot skin? See question at the end of this post on how to do this!
Note: It's best to use the links from the StarDock web site to make sure you are getting the correct skins.
3) Download the Skin and apply it using the StarDock software
a) Once you have found the skin you would like to apply as your boot / logon screen; simply click the download button on the wincustomize web site skin page and save the file somewhere temporary like "My Documents".
b) Open the BootSkin or LogonStudio application and use it to apply your chosen skin. You can simply click on the file as well which should open with the correct application.
BootSkin Note: You may need to import the skin in order to select it in the list if clicking on the file does not open the application. To do this click on 'File > Import from file', navigate to where you downloaded the skin to and click on open once you have the skin file selected.
LogonStudio Note: You need to unzip .zip files before you can open the skin in LogonStudio. Use 7-Zip (OpenSource) or other (winzip or winrar etc).
Need help?
Visit the following forum links for support: BootSkin Forum / LogonStudio Forum
Q) Can I create my own logon or Boot screen skin?
YES!
Visit the appropriate link below to create your own. If you think it is good, then upload it and share it on the wincustomize web site for others to enjoy too!
NOTE: You do not need to use Photoshop. If you like you can use Paint Shop Pro, or an OpenSource application such as http://www.gimp.org).
Boot Skin Tutorial
LogonStudio: Use the 'New' button to create your own ... see below for help ...
Comes with it's own Help which is installed with the application on your local hard drive (or where ever you install it to). However, you might find this post useful.
Friday, February 05, 2010
Something about Email you might not know of !
What is the difference between CC and BCC?
Cc stands for carbon copy which means that whose address appears after the Cc: header would receive a copy of the message. Also, the Cc header would also appear inside the header of the received message.
Bcc stands for blind carbon copy which is similar to that of Cc except that the Email address of the recipients specified in this field do not appear in the received message header and the recipients in the To or Cc fields will not know that a copy sent to these address.
So next time you want to hide certain contact(s) when sending out an email to more than one person simply use the Blind Carbon Copy feature instead of plain CC.
Great huh !
Great huh !
Subscribe to:
Posts (Atom)